Resulting from infusing his own desire into the Bloody Rose, Wataru's
Fangire nature is triggered as Kiva transforms from Emperor Form into
Flight Style, a dragon-like form called the Emperor Bat which is similar
to the Fangires' ability to become Sabbats. In Kamen Rider Kiva: King
of the Castle in the Demon World, Arc forces Wataru to assume the form
in an attempt to kill his father, Otoya Kurenai, only for Wataru to
access Flight Style later to defeat him. Flight Style uses the blades on
its wings called the Sonic Claws to perform the Demon Pliers attack and
breathes the Hell's Flame from its Big Jaw. These abilities come into
play for its finishing attack, the Bloody Strike.
Emperor Form is the true form of Kiva referred to as the Golden Kiva and
the most powerful form at Wataru's disposal. The fifth form accessed,
the first emergence of Emperor Form comes from the reaction to Wataru's
rage from the harm coming to Mio, his girlfriend, which summons Tatsulot
to awaken the form. By pulling the switch on Tatsulot, Wataru can
activate Tatsulot's Imperial Slot and activate one of several "Fever"
finishing attacks through a roulette system. With this form, Kiva can
destroy both the body and the soul of a Fangire. Soon after gaining this
form, Wataru gradually abandoned the use of his other forms
DoGaBaKi Form, shortened from "Dogga/Garulu/Basshaa/Kiva Form", is
Kiva's rarely seen form accessed by the summoning of all three Arms
Monsters. In this form, Kiva's left arm turns into the Garulu Arm, his right arm
turns into the Basshaa Arm , and his upper body turns into the Dogga
Breast. In this form, Kiva can use all three Arms Monster weapons at
once and the Darkness Moon Break. However, due to the danger it presents
to Kiva and the Arms Monsters, Kiva can only assume this form for five
minutes before its power becomes lethal.
Dogga Form is Kiva's form accessed from the Dogga Fuestle and granting
him access to the massive Dogga Hammer. In this form, Kiva's entire
upper body gains bulky armor and the Omnilens turn a shade of violet
called Dogga Purple, under Dogga's influence. In this form, Kiva loses
most of his speed but gains unbelievable strength, able to overpower a
Fangire easily. Dogga Form is able to manipulate electricity, using it
as part of his finisher, the Dogga Thunder Slap. The Dogga Hammer can
see through the invisibility of Fangires.
Basshaa Form is Kiva's form accessed from the Basshaa Fuestle and
granting him access to the Basshaa Magnum. In this form, the Omnilens
and Kiva's chest/right arm armor turn a shade of green called Basshaa Emerald which places Kiva under the influence
of Basshaa. While in this state, Kiva loses most of his strength and
ability, but gains a mastery of long range combat and is able to analyze
an opponent's weak point to target with accurate marksmanship. Basshaa
Form can also manipulate water, able to create rain as well as a pool of
water necessary to perform the Basshaa Aqua Tornado. When it is
performed, day turns to night and a half moon forms in the sky, as it
references the change ebb and flow of the tides during its phase.
Garulu Form is Kiva's form accessed from the Garulu Fuestle and being
energized by the Garulu Saber. In this form, the Omnilens and Kiva's
chest/left arm armor turn a shade of blue called Garuru Cobalt which
places Kiva under the influence of Garuru. This form's power is linked to the phases of the moon,
and is at its peak when the moon is full. The Garulu Form, is capable
of manipulating sound, has increased speed and cunning due to the form's
animalistic ferocity and is able to perform the Garulu Howling Slash.
Kiva Form is Kiva's default form, accessed through a bite from Kivat,
whose status determines Kiva's ability in a battle. He is able to see in
the dark with his visor called the Omnilens. In this form, Kiva can use
any of the Fuestles, with the Wake Up Fuestle to open
up the Catena Chains on his right leg known as the Hell's Gate made of
Lucifer Metal so Kiva can use his Rider Kick the Darkness Moon Break. The kick has an impact of 30,000 kg, enough to leave a crater in the shape of a bat's wings (Kiva's insignia) on any surface upon contact; the glass
body of a Fangire shatters instantly. Kiva can also perform a stronger
variation of the Darkness Moon Break when engulfed in Castle Doran's
fire. When the Darkness Moon Break is performed, day turns into night and a crescent moon appears in the sky.
Kamen Rider Accel Booster is a powered up form of Kamen Rider Accel that
is set to appear in Accel's version of the Kamen Rider W Returns DVD
releases. This yellow-colored form of Accel uses the wind power of Futo
channeled through the Gaia Memory Enhancing Adapter, increasing Accel's
power three-fold. Accel Booster has more armoring than Accel Trial and
also has three times as much thermal energy output.
Kamen Rider Accel Trial is the powered up form of Kamen Rider Accel. It
is much faster than Accel's normal form, but its armor and overall power
is weaker as a result. It makes up for its weakness by being able to
punch and kick much faster, as well as increasing his overall movement
speed (running, dodging, etc.) to a great degree. Once the Maximum Drive
is initiated, Accel Trial can only be used for another 10 seconds
before being forcibly reverted to human form, but the transformation is
retained if the Trial Maximum Drive is successfully executed in under 10
seconds. This form's Maximum Drive is the Machine Gun Spike Rider Kick,
a series of multiple kicks in a row which leave a series of energy
treadmarks in the form of a T. The power of this Maximum Drive is only
limited by how many kicks Accel Trial can perform within the 10 second
time limit. When Accel Trial combines the Engine Maximum Drive with the
Trial Maximum Drive, he can perform the Machine Gun Slasher Maximum
Drive, repeatedly slashing the target in the time limit rather than
kicking. Accel Trial's motif also includes the motocross off-road bike.
While transforming from into Accel Trial, Kamen Rider Accel changes
colors from red, to yellow, and then finally to blue as Accel Trial.
CycloneAccelXtreme is a form that is only described by Shroud as being
the ultimate form that can be attained by Kamen Rider Double. Rather
than being a union between Shotaro and Philip, CycloneAccelXtreme is the
union of Ryu Terui and Philip, as both of their physiologies make them
immune to the attacks of the Old Dopant and the Terror Dopant. Shroud
states that Ryu's hatred and rage is needed for Double to fight at its
full potential. However, Ryu decides not to fight as part of this form
after showing Shroud that they can fight with compassion rather than
hatred. Though not making a physical appearance in the series,
CycloneAccelXtreme appears in Kamen Rider: Climax Heroes OOO where he is
armed with both the Engine Blade and the Prism Bicker. While able to
use the Engine Blade's Gaia Memories in his attacks, CycloneAccelXtreme
uses the Prism Memory's ability to link Philip's three elemental Gaia
Memories with the Accel Memory to perform his own version of Bicker
Finallusion.
CycloneJokerGoldXtreme is an enhanced version of CycloneJoker Xtreme
that appears in Kamen Rider W Forever: A to Z/The Gaia Memories of Fate
as a result of strong winds affecting the Xtreme Memory. In this form,
the Crystal Server turns golden with a set of insect wings that allows
Double to fly. CycloneJokerGoldXtreme's Maximum Drive is the Golden
Xtreme Rider Kick. Double uses this form again during the events of
Movie War Core to finish Kamen Rider Core along side Kamen Rider OOO
Tajadol Combo.
CycloneJokerXtreme is the evolved form of CycloneJoker accessed with the
Xtreme Memory, linking it directly to the infinite knowledge of the
true Gaia Memory through the iridescent band going down the middle of
Kamen Rider Double's body called the Crystal Server. It also represents
the perfect union between Shotaro and Philip, as they become completely
one through the Xtreme Memory absorbing Philip and attaching to the
Double Driver. Thus when either Philip or Shotaro speaks on their own,
their respective side's eye flashes, they also appear together as soon
as they end the transformation. The knowledge of this form allows Double
to instantly analyze the opponent's capabilities. CycloneJokerXtreme's
Maximum Drive is the Double Xtreme Rider Kick; after closing and opening
the Xtreme Memory, a twister forms around Double that lifts him into
the air to then accelerate him down towards his target. By using the
Prism Memory in the Double Driver's Maximum Slot and activating its
Maximum Drive as well as the Xtreme Memory's Maximum Drive, it enables
CycloneJokerXtreme to perform a powered-up version of the Double Xtreme
called the Double Prism Xtreme which extends the initial drop kick into
bicycle kicks. In this form, Double wields the Prism Bicker which has
its own Maximum Drives.
FangJoker is a white and black form that Kamen Rider Double first uses to escape from Philip's captors during the events of the Begins Night as seen in Kamen Rider × Kamen Rider
W & Decade: Movie War 2010. As the Fang Memory was designed for
Philip, he and Shotaro's roles as Double are reversed in FangJoker, with
Shotaro's consciousness transferred into Philip's body for the
transformation. Because of this, when Shotaro speaks, Double's left eye
flashes. This allows Philip to go out into the open and utilize Double
in case Shotaro is not around to help. However, the transformation is
extremely taxing on Philip's body, and he lost control of himself in
this form during its first two uses. In addition, they cannot stay in the
FangJoker form for too long due to Philip's weaker body. By activating
the Fang Memory's horn between one and three times, FangJoker is able to
summon a bladed weapon that forms on various portions of FangJoker's
body. One time summons the Arm Saber on FangJoker's wrist to be used as a
close combat weapon; two times summons the Shoulder Saber, which can be
removed from his right shoulder to be used as a dagger or
boomerang-like weapon; three times summons the Maximum Saber on his right ankle. This last Saber is used to perform FangJoker's Maximum
Drive: the flying roundhouse Rider Kick Fang Streiser, in which a
projection of the Fang Memory's head is shown "biting" the opponent when
Double comes in contact.
LunaTrigger is a form that first appears in the television series. It is
a gold and blue form accessed from the Luna and Trigger Memories. In this form, Kamen Rider Double's Trigger Magnum is able to fire gold and blue bolts that can curve and track targets. This form's Maximum Drive finisher is the Trigger Full Burst, which fires multiple charged homing shots at the enemy.
LunaMetal is a gold and silver-colored Half Change accessed through the Luna and Metal Memories. In this form, Double can wield the Metal Shaft by means of the Metal Memory's powers, using the Luna Memory's abilities to use it like a whip. This form's Maximum Drive finisher is the Metal Illusion where Double spins the Metal Shaft around to create golden rings that float around Double, before unleashing them upon the target all at once.
LunaJoker is the first Half Change form used by Double within the
series, a gold and black-colored form accessed through the Luna and
Joker Memories. In this form, Double has the ability to stretch his right limbs by means of the Luna Memory's powers. This form's Maximum
Drive finisher is a Rider Chop called the Joker Strange, during which
LunaJoker splits down the middle, the Luna half makes four copies of
itself, and all five Luna halves execute rapid-fire karate chops on the
target, and then the Joker half strikes the target with an energy
powered chop.
HeatTrigger is a red and blue-colored Half Change accessed through the Heat and Trigger Memories.
In this form, Double wields the Trigger Magnum by means of the Trigger
Memory's powers and shoots fire blasts by means of the Heat Memory's
powers. This form's Maximum Drive finisher is the Trigger Explosion,
which fires a single constant stream of fire that completely melts the
enemy. HeatTrigger is the only form of Double's that has attempted to
perform a Twin Maximum, in which the Trigger Magnum blasts out a massive fireball that incinerates anything in its path.
HeatMetal is the second form used by Kamen Rider Double, first appearing
in the Decade movie All Riders vs. Dai-Shocker. It is colored red and
silver and is accessed from the Heat and Metal Memories. In this form, the damage from the Metal Shaft is increased by fire. A common tactic used by Double is to turn around while changing to this form, using the Metal Shaft on his back to block enemy attacks. This form's Maximum Drive finisher is the Metal Branding, causing one or both ends of the Metal
Shaft to ignite on fire and deliver a final blow to the opponent. A
variation of this attack is the Steam Metal Branding, with the use of
Accel's Engine Blade in the Hyper Battle DVD.
HeatJoker is the first Half Change form used by Kamen Rider Double when he appears in the Kamen Rider Decade film, colored red and black and is accessed through the Heat and Joker Memories. In this form, Double can throw flaming punches by means of the Heat Memory's powers. This form's Maximum Drive finisher is a Rider Punch called the Joker Grenade, during which Kamen Rider
Double somersaults in mid-air, then HeatJoker's body splits down the
middle during descent as the halves each hit the target with elementally
energized hooks.
CycloneTrigger is a green and blue-colored Half Change accessed through the Cyclone and Trigger Memories.
In this form, Double wields the Trigger Magnum by means of the Trigger
Memory's powers and is able to shoot out high compressed air by means of
the Cyclone Memory's powers. This form's Maximum Drive finisher is the Trigger Aerobuster, firing multiple shots of pressurized air at the enemy.
CycloneMetal is a green and silver-colored Half Change accessed through the Cyclone and Metal Memories. In this form, Double can wield the Metal Shaft by means of the Metal Memory's powers. When swung, the Metal Shaft creates blades of wind by means of the Cyclone Memory. This form's Maximum Drive finisher is the Metal Twister where Double spins around while swinging the Metal Shaft covered in an aura of wind.
CycloneJoker is Kamen Rider Double's primary form, colored green and black and is accessed from the Cyclone and Joker Memories. In this form, Double's kicks are powered by wind, increasing the damage and adding cutting potential. This form's Maximum Drive finisher is a Rider Kick called the Joker Extreme, during which a tiny controlled tornado lifts Kamen Rider
Double into the air before Double's body splits down the middle as the
halves reach their target in a drop kick fashion. A variation of this
attack involves Kamen Rider Double jumping off the back wheel of Kamen Rider
Accel Bike Form, allowing for faster acceleration upon descent. During
the events of Shotaro's jidaigeki-influenced dream, this form is known
as ShippuKirifuda, and the Gaia Memories are replaced by wooden placards known as kifuda.
Burakawani Combo is Kamen Rider OOO's orange combination that appears in
Kamen Rider OOO Wonderful: The Shogun and the 21 Core Medals. It uses
the powers of the three reptile-themed Core Medals: Cobra, Kame, and
Wani, that were last known to be in the possession of Tokugawa
Yoshimune. But when Eiji and company appear in Edo due to a time
distortion caused by Gara, Eiji gains the Core Medals during his battle
against the Nue Yummy. Burakawani Combo's body is covered in a substance
called Soma Venom, which makes him able to heal instantly after taking
any attack. His eyesight is doubled and gains infra-red vision, uses the
turtle shell-like Goura Guardner, which can be put together to form an
energy shield called the Gora Shielduo, and use the Saw Deadscythers on
his legs to cut enemies. In addition, he is armed with the Burahngi,
which lets him summon a giant cobra from the top of his head to attack
enemies. This Combo's Scanning Charge finisher is a Rider Kick called
the Warning Ride, where Kamen Rider OOO projects three orange rings in
front of him before dashing through them in a foot-first slide,
unleashing a powerful kick with the Saw Deadscythers.
Putotyra Combo is Kamen Rider OOO's purple combination using the powers
of the purple Core Medals that forced themselves into Eiji's body:
Ptera, Toricera, and Tyranno. Though it is the most powerful form that
Kamen Rider OOO can assume, it originally turns Eiji into a mindless
beast if he stays in the Combo for too long. He eventually manages to
exert his will over the purple Core Medals, but he still suffers from
the physical strain resulting from Combo use, and is still at risk of
"letting himself go" if he does not consciously keep control. As a
result of the purple Medals residing in his body, Eiji is gradually
turning into a Greeed the longer the Medals are inside him. After Eiji
gains two more Purple Medals, he can access this from in the usual way.
He can freeze opponents with a cold wind, use the wing-like External Fins on the Ptera Head to fly, use the Wind Stingers that can extend and attack the enemy from far areas, and is armed with the Tail
Divider that can deliver a powerful blow and the Legsteranail claws for
powerful kicks. In addition, he is armed with the Medagabryu. Unlike
other Combos, the OOO Armor becomes white and cannot mix-and-match with
other Medals, due to their Medals' nature as the antithesis of desire
negating the power of the other Core Medals.
Tamashii Combo, also known as the "Soul Combo" and the "Monster Combo",
is Kamen Rider OOO's special combination, that appears in the OOO,
Den-O, All Riders: Let's Go Kamen Riders film, using the powers of Taka,
Imagin, and Shocker Medals. As Tamashii Combo, Kamen Rider OOO can see
far distances, use the Orenotsuno, and the talon-like attachments of the
Shocker Legs. This Combo's Scanning Charge finisher is the Tamashii
Bomber, where the Shocker symbol appears on an enemy before Kamen Rider
OOO launches a ball of energy made from the Imagin Arms.
Shauta Combo is also known as the "Marine Combo" and is Kamen Rider
OOO's blue combination, using the powers of Mezool's Core Medals: Shachi
(Orca), Unagi (Eel), and Tako (Octopus). As Shauta Combo, Kamen Rider
OOO excels in underwater combat, gains the ability to liquefy his body,
can use the Unagi Whips and the Tako Legs' tentacle-themed powers. One
of his attacks in this Combo is the Voltarm Whip. This Combo's Scanning
Charge finisher is Octo Banish, where Kamen Rider OOO liquefies his body
and going airborne, then uses the Unagi Whips to bind and throw the
opponent up, finally finishing it with his Tako Legs forming a drill to
burst through the opponent.
Sagohzo Combo is also known as the "Gravity Combo" and is Kamen Rider
OOO's grey combination, using the powers of Gamel's Core Medals: Sai
(Rhino), Saru (Gorilla), and Zou (Elephant). As Sagohzo Combo, Kamen
Rider OOO gains superhuman strength and gravity manipulation, able to
create powerful shock waves by banging his Gorilla Arms against his chest and
cause minor earthquakes with the Zou Legs. Some of his attacks in this
Combo are the Bagon Pressure, where the Gori Bagon gauntlets are
launched from his arms, and a powerful dropping attack called the Zuo
Stomp. This Combo's Scanning Charge finisher is Sagohzo Impact, where he
jumps in the air and does a strong stomp, which traps a Yummy in the
ground, pulling it towards him so he can deliver a double handed punch
and headbutt at the same time.
Latorartar Combo is also known as the "Scorching Combo" and it is Kamen
Rider OOO's yellow combination, using the powers of Kazari's Core
Medals: Lion, Tora (Tiger), and Cheetah. As Latorartar Combo, he can
emit light intense enough to incinerate, use the Tora Claws and use the
Cheetah Legs to run at blurring speeds and perform a rapid barrage of
kicks. One of his attacks in this Combo is the Revol Spin Kick.
This Combo's Scanning Charge finisher is Liodias, where Kamen Rider OOO
projects three yellow rings in front of him before charging through
them with the Cheetah Medal's speed before delivering a cross slash on
the target with the Tora Claws infused with the Lion Medal's energy
projection.
Gatakiriba Combo is also known as the "Strongest Combo" and is Kamen
Rider OOO's green combination, using the powers of Uva's Core Medals:
Kuwagata (Stag Beetle), Kamakiri (*Praying Mantis)*, and Batta (Grasshopper). As Gatakiriba Combo, he can create massive numbers of duplicates
of himself, use the Kamakiri Swords, and jump high with the Batta Legs.
However, Eiji claims it is extremely difficult to revert back to being
just a single Kamen Rider OOO so that he can cancel the transformation. This Combo's Scanning Charge finisher is the Gatakiriba Kick Rider Kick, where he and his many duplicates all jump into the air and converge on the opponent, reintegrating back to one after hitting the target.
Tatoba Combo is also known as the "Multi Combo", is Kamen Rider OOO's
main combination, using the powers of the Taka (Hawk), Tora (Tiger), and
Batta (Grasshopper) Medals. As
the Tatoba Combo, Kamen Rider OOO can see far distances, use the Tora
Claw gauntlets, and can jump and kick with great strength. This Combo's
Scanning Charge finisher is called the Tatoba Kick, where after jumping
high up with the power of the Batta Legs, he descends with a drop kick
through the three rings that form, surrounding him with a different aura
based on the three Medals.
Tajadol Combo is also known as the "Blazing Combo" and is Kamen Rider
OOO's red combination, using the powers of Ankh's Core Medals: Taka
(Hawk), Kujaku (Peacock), and Condol (Condor). As Tajadol Combo, he can
see far distances, create energy peacock tail feathers
as projectiles to throw at opponents, use the Kujaku Wings to fly,
shoot streams of fire and use the talon-like attachments of the Condol
Legs. In addition, he is armed with the Taja Spinner, which can shoot
fire disks. Giga Scan can be done by replacing some of the Cell Medals
in the Spinner with Core Medals, then scanning it with the OOO Scanner.
This Combo's Scanning Charge finisher is the Prominence Drop Rider Kick,
where after sprouting wings from the Kujaku Arms, he flies into the
air, flips around and performs a flying drop kick on the target with the
Condol Legs extending its talons as he ignites. The downside of this
combo being that it is even more taxing on Eiji's body, with him
beginning to collapse after prolong use before even canceling the transformation.
Though he first uses this Combo to fight the Lion-Kurage Yummy in
episode 20, Tajadol Combo debuts during the events of Movie War Core to
finish Kamen Rider Core alongside Kamen Rider Double CycloneJoker Gold
Xtreme.
The colorful Core Medals are the O Medals that allow Kamen Rider OOO to
transform and change between his various Combos. These five types of
Core Medals were originally fifty created by human scientists 800 years
ago as a means to create artificial life,
drawing from characteristics of different animals, forming the core of
the Greeed before one Medal in each set was destroyed. Each Greeed has a
specific shade of color that their Core Medals come in: Ankh's Core
Medals are red, Uva's are green, Kazari's are yellow, Mezool's are blue,
and Gamel's are gray. In the beginning, after stealing some from his
fellow Greeed, Ankh holds many of the Core Medals and gives them to Eiji
when he wants him to fight as Kamen Rider OOO. Later, Ankh gives Eiji
the Taka, Tora, and Batta Medals so he can defend himself when Ankh is
not around. However, seeing Eiji's first use of the Latorartar Combo as
reckless, Ankh takes the Core Medals back, stating he should have never
given them to Eiji in the first place.
S-1. Rocket Switch Super-1 (ロケットスイッチスーパーワン, Roketto Suitchi Sūpā Wan,
Circle): The Rocket Switch Super-1 allows Kamen Rider Fourze to use two
Rocket Modules while assuming Rocket States. This special Switch is
created by Kamen Rider Nadeshiko,
originally using it as her personal Rocket Switch prior to Kannagi
converting her into the SOLU Switch. Even after Super Galaxy King's
destruction and Nadeshiko leaving Earth as a sentient energy being,
Gentaro kept the Rocket Switch Super-1 on his person. The Rocket Switch
Super-1 is later used, along with the Drill Switch Super-3, to arm the
two Rocket Modules to Go-BusterOh's arms.
Drill Switch Super-3 S-3. Drill Switch Super-3 (ドリルスイッチスーパースリー, Doriru Suitchi Sūpā Surī, Triangle):
The Drill Switch Super-3 allows Kamen Rider Fourze to arm Go-BusterOh's
legs with two Drill Modules. This special Switch was created by Kengo
to be used along with the Rocket Switch Super-1. By using the Rocket
Switch Super-1 and Drill Switch Super-3 together, it creates a link
between the Fourze Driver and Go-BusterOh, the Go-Busters' MegaZord, arming it with giant versions of the Rocket and Drill Modules in a combination known as Rocket Drill Go-BusterOh.
Aero Switch (エアロスイッチ, Earo Suitchi, Triangle): The Aero Switch arms Kamen Rider Fourze with the turbine-like Aero Module (エアロモジュール, Earo Mojūru)
on his left leg, allowing him to suck in large quantities of air so it
can then be pressurized and expelled to either lift Fourze off of the
ground, or direct the pressurized air at a target to disorient it from
the intense winds.
Gyro SwitchGyro Switch (ジャイロスイッチ, Jairo Suitchi, Square): The Gyro Switch arms Kamen Rider Fourze with the helicopter rotor-like Gyro Module (ジャイロモジュール, Jairo Mojūru)
on his left arm, allowing him to hover into the sky. Compared to the
Rocket Module, another Module that grants flight, the Gyro Module has
far greater handling and control, though sacrifies speed at the same
time. It is generally used to operate the Nuggegyroika.
Net SwitchNet Switch (ネットスイッチ, Netto Suitchi, Cross): The Net Switch arms Kamen Rider Fourze with the butterfly net-like Net Module (ネットモジュール, Netto Mojūru)
on his right leg, allowing him to create a electromagnetic net to scoop
up incredibly tiny objects by swinging his leg. If the tiny objects
turns out to be a Zodiarts, the net will recombine the broken-up pieces
and force the Zodiarts to stay together, all while binding the arms
together.
Stamper SwitchStamper Switch (スタンパースイッチ, Sutanpā Suitchi, Triangle): The Stamper Switch arms Kamen Rider Fourze with the rubber stamp-like Stamper Module (スタンパーモジュール, Sutanpā Mojūru)
on his left leg. How this Module works is first Fourze would kick a
Zodiarts with the Stamper, the Module boosting his kicking damage when
the hydrolics kick in, leaving a "stamp" of the Kamen Rider Club logo. The "stamp", after 15 seconds, explodes with a focused blast, doing additional damage.
Cosmic SwitchCosmic Switch (コズミックスイッチ, Kozumikku Suitchi, Circle): The Cosmic Switch arms Kamen Rider Fourze with the Cosmic Module Barizun Sword.
However, in it's first testing, the Switch would not even go into the
Driver, and shorted out when Gentaro pressed the big red button it has
one too many times, triggering an explosion. Once Gentaro was brought to
life with this Switch, the Cosmic Swich allows Fourze to transform into
Cosmic States.
Freeze Switch (フリーズスイッチ, Furīzu Suitchi, Cross): The Freeze Switch arms Kamen Rider Fourze with the refrigerator-like Freeze Module (フリーズモジュール, Furīzu Mojūru)
on his right leg, which allows him to emit super cold vapors to freeze
liquids in a mere instant. It is generally used to operate the Softonya
Foodroid.
Claw SwitchClaw Switch (クローモッチ,, Kurō Suitchi, Circle): The Claw Switch arms Kamen Rider Fourze with the triclaw-like Claw Module (クローモジュール, Kurō Mojūru) on his right arm, allowing him to cleave into enemies. It can also serve as a decent shield against melee attacks.
Board SwitchBoard Switch (ボードスイッチ, Bōdo Suitchi, Triangle): The Board Switch arms Kamen Rider Fourze with the snowboard-like Board Module (ボードモジュール, Bōdo Mojūru) on his left leg, which allows Fourze to travel on the ground with no resistance at all.
Giantfoot SwitchGiantfoot Switch (ジャイアントフットスイッチ, Jaiantofutto Suitchi, Cross): The Giantfoot Switch arms Kamen Rider Fourze with the boot-like Giantfoot Module (ジャイアントフットモジュール, Jaiantofutto Mojūru)
on his right leg, which increases his kicking power. It also allows him
to focus and amplify gravity at a localized point to bring opponents
down, by stomping his foot on the ground. A mirage of the Giantfoot
Module appears above the opponent as a side effect, making Kamen Rider
Fourze seem like he is mentally creating a construct of Cosmic Energy to
crush his opponents.
Wheel Switch (ホイールスイッチ, Hoīru Suitchi, Triangle): The Wheel Switch arms Kamen Rider Fourze with the Wheel Module (ホイールモジュール, Hoīru Mojūru) on his left leg, which gives him two wheels akin to a Segway to allow him to move at high speeds without straining himself or getting the Masshingler. It can also run up walls.
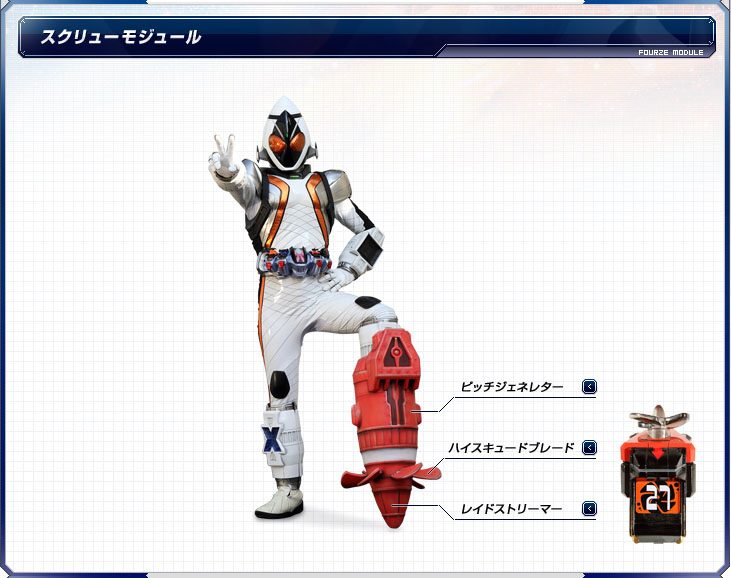
Screw SwitchScrew Switch (スクリュースイッチ, Sukuryū Suitchi, Triangle): The Screw Switch arms Kamen Rider Fourze with the submarine-like Screw Module (スクリューモジュール, Sukuryū Mojūru) on his left leg, allowing him to propel himself underwater without tiring himself out.
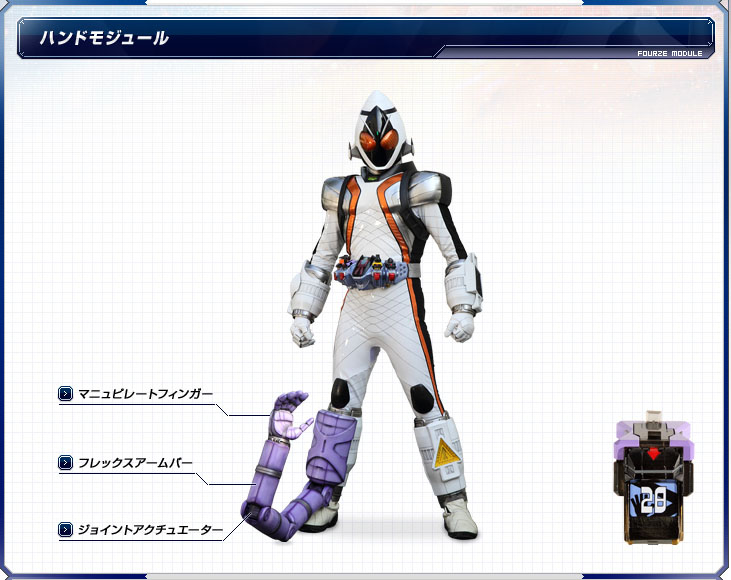
Hand SwitchHand Switch (ハンドスイッチ, Hando Succhi, Cross): The Hand Switch arms Kamen Rider Fourze with the Hand Module (ハンドモジュール, Hando Mojūru)
on his right leg, allowing him to utilize another manipulator arm, this
time being used for delicate things. With concentration, the Hand
Module can disassemble stuff.
Schop SwitchSchop Switch (スコップスイッチ, Sukoppu Suitchi, Circle): The Schop Switch arms Kamen Rider Fourze with the power shovel-like Schop Module (スコップモジュール, Sukoppu Mojūru)
on his right arm, allowing him to dig into the ground with ease, as
well as lift an incredible amout of dirt to bury a target in a giant
mound of dirt. The Schop Switch is generally used to operate the
Horuwankov Foodroid.
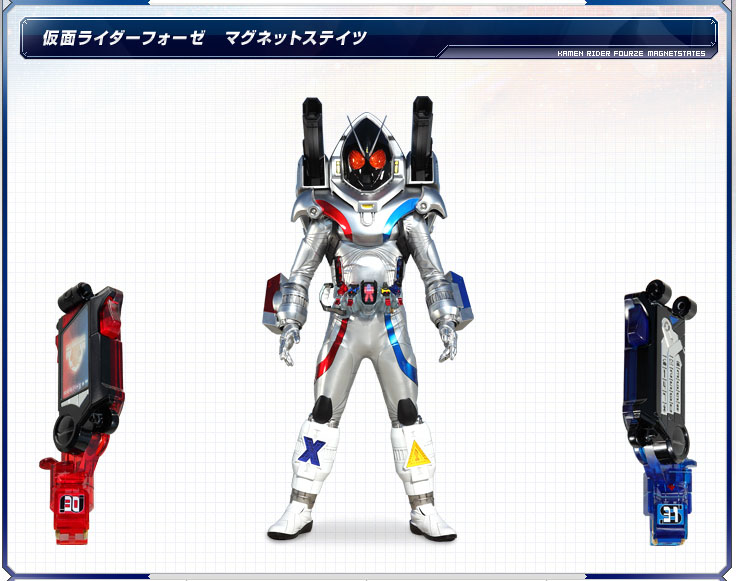
N Magnet & S Magnet SwitchesN Magnet Switch (Nマグネットスイッチ, Enu Magunetto Suitchi, Circle):
The N Magnet Switch is built into the MagPhone along with the S Magnet
Switch, which allows Kamen Rider Fourze to become Magnet States. The N
Magnet Switch, when used by itself, allows Kamen Rider Fourze to use the
giant red-colored, north pole aligned, magnet bar-like N Magnet Module (Nマグネットモジュール, Enu Magunetto Mojūru)
when it is not fully utilized. The N Magnet Module has a very powerful
magnetic field, thus any metal object that can be magnetized will be
attracted to Fourze's body. If the S Magnet Module is active, the N
Magnet Module will be attracted and form unintentional cuffs. After it
has been modified into the NS MagPhone with the S Magnet Switch, Fourze
is able to control the Module and also changes into the powerful Magnet
States.
S Magnet Switch (Sマグネットスイッチ, Esu Magunetto Suitchi, Square):
The S Magnet Switch is built into the MagPhone along with the N Magnet
Switch, which allows Kamen Rider Fourze to assume Magnet States. The S
Magnet Switch, when used by itself, allows Kamen Rider Fourze to use the
giant blue-colored, south pole aligned, magnet bar-like S Magnet Module (Sマグネットモジュール, Esu Magunetto Mojūru)
when it is not fully utilized. The S Magnet Module has a very powerful
magnetic field, thus any metal object that can be magnetized will be
attracted to Fourze's body. If the N Magnet Module is active, the S
Magnet Module will be attracted and form unintentional cuffs. After it
has been modified into the NS MagPhone with the N Magnet Switch, Fourze
is able to control the Module and also changes into the powerful Magnet
States.
Stealth Switch (ステルススイッチ, Suterusu Suitchi, X): The Stealth Switch arms Fourze with the Lockheed F-117 Nighthawk-looking Stealth Module (ステルスモジュール, Suterusu Mojūru)
on his right leg, allowing Fourze to become invisible for 5 seconds. It
works by absorbing reflected light off of the Fourze System.
Hammer SwitchHammer Switch (ハンマースイッチ, Hanmā Suitchi, Square): The Hammer Switch arms Fourze with the squeaky hammer-looking Hammer Module (ハンマーモジュール, Hanmā Mojūru)
on his left arm (though the majority of the Module covers only his
hand), allowing Fourze to do incredible damage with it. He can also slam
the Module onto the ground to make a shockwave travel through the
ground to floor a Zodiarts. However, if the Hammer Module hits something
that's too hard to hit, the shockwave instead travels backwards,
harming the user. During the Aries Zodiarts incident, this Astroswitch
was rendered useless after Aries cuts it off from the Fourze System.
Water SwitchWater Switch (ウォータースイッチ, Uōtā Suitchi, Triangle):The Water Switch arms Kamen Rider Fourze with the faucet-looking Water Module (ウォーターモジュール, Uōtā Mojūru) on his left leg, allowing him to shoot intense streams of water from the nozzle for ranged attacks.
Medical SwitchMedical Switch (メディカルスイッチ, Medikaru Suitchi, Square: The Medical Switch arms Kamen Rider Fourze with the med-kit looking Medical Module (メディカルモジュール, Medikaru Mojūru) on his left arm, which gives him access to various medicines made from Cosmic Energy.
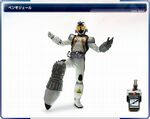
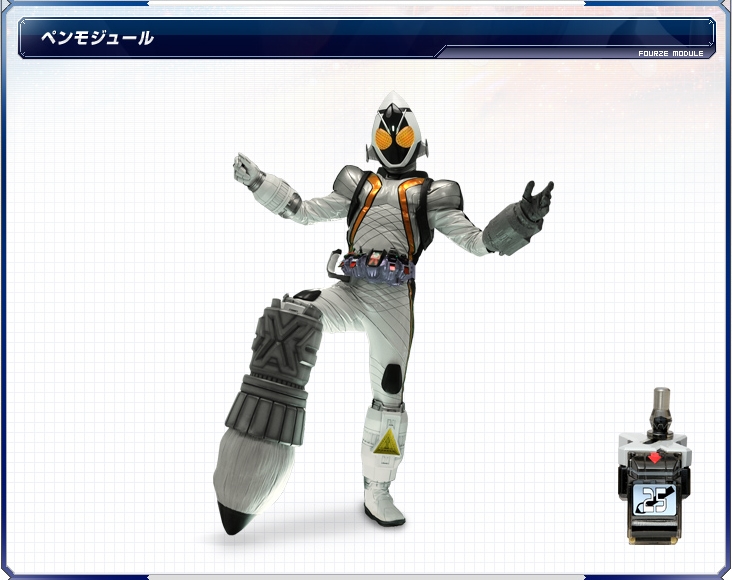
Pen SwitchPen Switch (ペンスイッチ, Pen Suitchi, Cross): The Pen Switch arms Kamen Rider Fourze with the calligraphy brush-looking Pen Module (ペンモジュール, Pen Mojūru)
on his right leg. When swung, Fourze can make three-dimensional objects
on any surface from the "ink", which can serve as either improvised
shields or to reveal invisible enemies after the ink hits it's mark.
What the material the solidifed "ink" is made of is none other than pure
carbon. It has a Limit Break, where Fourze covers the foe in the Pen
Switch's ink to disable any special abilities a Zodiarts might have.
Winch Switch (ウインチスイッチ, Uinchi Suitchi, Square): The Winch Switch arms Fourze with the drum-style Winch Module (ウインチモジュール, Uinchi Mojūru) on his left arm, which has a spinning turbine. The Winch Module's Boost Hooker (ブーストフッカー, Būsuto Fukkā) shoots out at high speed and can pull objects with up to 5 tons.
Flash SwitchFlash Switch (フラッシュスイッチ, Furasshu Suitchi, Circle): The Flash Switch arms Fourze with the Flash Module (フラッシュモジュール, Furasshu Mojūru)
on his right arm, allowing Kamen Rider Fourze to blind enemies (or
anybody else for that matter, including himself) with the light of the
sun at full power. Fourze can also control the intensity of the Flash
Module's light, so he can use it like a flashlight. The Flash Switch is
generally used for the Flashake Foodroid.
Shield SwitchShield Switch (シールドスイッチ, Shīrudo Suitchi, Square): The Sheild Switch arms Fourze with the Lockheed Martin X-33-looking Shield Module (シールドモジュール, Shīrudo Mojūru)
on his left arm, allowing him to protect himself from any attack,
though it is rather small in size. The Shield Module is also made from
Astorium. Despite this, the Shield Module was rendered useless in future
fights with the Cancer Zodiarts, as it's claw arm cleaved the Module in
half.
Gatling SwitchGatling Switch (ガトリングスイッチ, Gatoringu Suitchi, Triangle): The Gatling Switch arms Fourze with the Gatling Module (ガトリングモジュール, Gatoringu Mojūru)
on his left leg, allowing Kamen Rider Fourze to shoot 10 rounds per
second. The bullets have enough power to pierce into concrete.
Fire SwitchFire Switch (ファイアースイッチ, Faiyā Suitchi, Circle): The Fire Switch allows Fourze to enter Fire States and arms him with the Fire Module Hea-Hackgun (ファイヤーモジュール ヒーハックガン, Faiyā Mojūru Hīhakku Gan).
Having learned from the Elek Switch, Fourze had no problem accessing
Fire States. The Fire Switch's dormant ability is to absorb heat-based
attacks to enhance it's own.
Scissors Switch (シザーススイッチ, Shizāsu Suitchi, Square): The Scissors Switch arms Fourze with the arts-and-crafts-looking Scissors Module (シザースモジュール, Shizāsu Mojūru)
on his left arm, which allows him to cut though even metal. If the
second opening of the show is any indication, it can also fire a pulse
of energy for a long-range attack. The Scissors Switch is generally used
to operate the Potechokin.
Beat SwitchBeat Switch (ビートスイッチ, Bīto Suitchi, Cross): The Beat Switch arms Fourze with the Beat Module (ビートモジュール, Bīto Mojūru)
on his right leg, resembling a small subwoofer that can produce sonic
waves with a range of 20Hz-5kHz and a tweeter with a range of
5kHz-24kHz. A rather hilarious aspect of the Beat Module is that it can
behave much like a normal subwoofer.
Chain Array SwitchChain Array Switch (チェーンアレイスイッチ, Chēn Arei Suitchi, Circle): The Chain Array Switch arms Fourze with the Chain Array Module (チェーンアレイモジュール, Chēn Arei Mojūru) on his right arm, which is a glorified spiked flail. The steel ball on the end of the chain is called the Blowing Star (ブローイングスター,Burōingu Sutā), weighing about 120 kg. The Rough Spikers (ラフスパイカー, Rafu Supaikā) on the Blowing Star are made from a newly discovered metal known as Astorium (アストリウム<, Asutoriumu).
It seems old-fashioned and low-tech, but it gets the job done in
handling Zodiarts. The Chain Array's links can also stretch. Like any
chained weapon, inertia is a factor to make sure Fourze doesn't end up
smacking the Module into himself, and there is also the chance of the
Module being reflected back onto Fourze.
Smoke SwitchSmoke Switch (スモークスイッチ, Sumōku Suitchi, Cross): The Smoke Switch arms Fourze with the Smoke Module (スモークモジュール, Sumōku Mojūru),
allowing him to emit smoke within a 5 mile radius for 5 minutes which
can obstruct an opponent's vision in close combat, not to mention
disorientate said opponent from the choking smoke.
Spike SwitchSpike Switch (スパイクスイッチ, Supaiku Suitchi, Triangle): The Spike Switch arms Fourze with the leg-brace of the Spike Module (スパイクモジュール, Supaiku Mojūru)
on his left leg, giving Kamen Rider Fourze an advantage in close-range
kicks. The Spike Module consists of Rough Spikers, again made out of
Astorium, only they extend a good two feet seconds before impact for
maximum damage/penetration. It is also quite heavy, as Fourze had to use
both arms to lift his leg out of a foot-deep hole speculated to be
caused by the Spike Module, as it happened off-screen.
Camera Switch (カメラスイッチ, Kamera Suitchi, Square): The Camera Switch arms Fourze with the Camera Module (カメラモジュール, Kamera Mojūru)
on his left arm, allowing him to view far distances and see things that
normally isn't noticed. It can also receive data from the environment
nearby. The Camera Switch is generally used to operate the Burgermeal,
though it is implied there are other Burgermeals being look out without
the use of the Camera Switch. Also, the Module is more powerful than a
Burgermeal.
Parachute SwitchParachute Switch (パラシュートスイッチ, Parashūto Suitchi, Square): The Parachute Switch arms Fourze with the Parachute Module (パラシュートモジュール, Parashūto Mojūru)
on his left arm, allowing him to deploy three parachutes to land safely
to the ground if in freefall from a signifigant height. When the
parachutes are not in use, thay are stored in the dark green box on
Kamen Rider Fourze's arm.
Chainsaw SwitchChainsaw Switch (チェーンソースイッチ, Chēnsō Suitchi, Cross): The Chainsaw switch arms Fourze with the Chainsaw Module (チェーンソーモジュール, Chēnsō Mojūru)
on his right leg, allowing him to use the saw on his foot that has a
powerful engine that can rotate the blade up to 15,000 rounds per
minute, cutting into even the toughest of Zodiarts armor. Because the
blade is on the foot, maneuverability is an issue to make sure Fourze
doesn't cut himself.
Hopping SwitchHopping Switch (ホッピングスイッチ, Hoppingu Suitchi, Triangle): The Hopping Switch arms Fourze with the pogo stick-like Hopping Module (ホッピングモジュール, Hoppingu Mojūru)
on his left leg, allowing him to to significantly increase his maximum
jumping height from 20 meters to 40 meters. However, this Module is
unpredictable and great control is needed to use this Module properly.
Elek SwitchElek Switch (エレキスイッチ, Ereki Suitchi, Circle): The Elek Switch arms Fourze with the Elek Module Billy the Rod (エレキモジュール ビリーザロッド, Ereki Mojūru Birīza Roddo).
Initially, it just changed his right forearm's color to gold and armed
him with just Billy the Rod and suffered backlash shock from the power,
but after allowing the Elek Switch's power to course into Fourze's body,
it allows Fourze to assume Elek States.
Rocket Switch (ロケットスイッチ, Roketto Suitchi, Circle): The Rocket Switch arms Fourze with the Rocket Module (ロケットモジュール, Rokketto Mojūru)
on his right arm, allowing him to fly. By using the exhaust ports on
the Rocket Module, Fourze can add 40 additional tons to his punches. He
had the inital problem of unable to control the Rocket Module's ports.
First used in Kamen Rider OOO WONDERFUL: The Shogun and the 21 Core Medals.
Launcher SwitchLauncher Switch (ランチャースイッチ, Ranchā Suitchi, Cross): The Launcher Switch arms Fourze with the Launcher Module (ランチャーモジュール, Ranchā Mojūru)
on his right leg, allowing him to attack enemies from a far distance.
The module can launch 5 missiles to attack an enemy, though with
improper handling, the flight pattern of the missiles can be very
chaotic. During the Aries Zodiarts incident, this Astroswitch was
rendered useless after Aries cuts it off from the Fourze System.
Drill SwitchDrill Switch (ドリルスイッチ, Doriru Suitchi, Triangle): The Drill Switch arms Fourze with the Drill Module (ドリルモジュール, Doriru Mojūru)
on his left leg, allowing him to drill through the ground and pierce
enemies with a powerful kick, though it limits his movements. It spins
around 200 RPM.
Radar SwitchRadar Switch (レーダースイッチ, Rēdā Suitchi, Square): The Radar Switch arms Fourze with the Radar Module (レーダーモジュール, Rēdā Mojūru)
on his left arm, allowing him to detect any enemies that are not
visible and reflect certain waves, as well as make contact with Kengo
from the Rabbit Hutch. The module can also be used with the Launcher
Module to launch very precise homing missiles. First used in Kamen Rider OOO WONDERFUL: The Shogun and the 21 Core Medals.
Magic Hand SwitchMagic Hand Switch (マジックハンドスイッチ, Majikku Hando Suicchi, Circle): The Magic Hand Switch arms Fourze with the Magic Hand Module (マジックハンドモジュール, Majikku Hando Mojūru)
on his right arm allowing him to use a large manipulator arm which
gives him an extra 10 meters of reach and pick up heavy objects using
the End Effect Pench (エンドエフェクトペンチ, Endo Efekuto Penchi). First used in Kamen Rider OOO WONDERFUL: The Shogun and the 21 Core Medals.
The Astroswitches (アストロスイッチ, Asutorosuitchi) are mysterious devices that are the source of Kamen Rider Fourze's powers. They are infused with Cosmic Energy to materialize armaments known as the Fourze Modules (フォーゼモジュール, Fōze Mojūru). Ten of them at a time can be carried in the Astroswitch Kaban. They can also be used to operate Foodroids as well as serve as power-ups for Kamen Rider Meteor.
There are 40 known normal Astroswitches in total, 10 of which each
correspond to one of the attachment ports on Kamen Rider Fourze's limbs,
known as Module Basements (モジュールベイスメント, Mojūru Beisumento).
Circle Module Basement (サークルモジュールベイスメント, Sākuru Mojūru Beisumento):
Right Arm. Circle Astroswitches in nature tend to be close-combat
weapons, as well as having the capacity to change Fourze's States.
Cross Module Basement (クロスモジュールベイスメント, Kurosu Mojūru Beisumento): Right Leg. Cross Astroswitches in nature tend to be mid-ranged weaponry.
Triangle Module Basement (トライアングルモジュールベイスメント, Toraianguru Mojūru Beisumento): Left Leg. Triangle Astroswitches in nature tend to be themed after transport.
Square Module Basement (スクエアモジュールベイスメント, Sukuea Mojūru Beisumento): Left Arm. Square Astroswitches in nature tend to be battle-support items.
Kamen Rider Fourze(仮面ライダーフォーゼ Kamen Raidā Fōze) adalah salah satu sebuah drama Tokusatsu Jepang di Perusahaan Toei Company Seri Kamen Rider, menjadi seri ketiga belas dalam jangkaperiod heisei dan dua puluh secara keseluruhan. ini mulai ditayangkan pada tanggal 4 September 2011, seminggu setelah selesainya Kamen Rider OOO, bergabung Kaizoku Sentai Gokaigerdan kemudian Tokumei Sentai Go-Busters di dalam super hero time.
Merek dagang pada judul yang diajukanoleh Toei pada April 2011. Tidak
hanya memperingati 40 tahun Kamen Rider Series, tapi juga peringatan 50
tahun spaceflight, yang dimulai dengan Penerbangan Yurin Gagarin pada tahun 1961.
Slogan acaranya adalah " Semesta di tanganmu, Dengan tangan itu
gapailah Semesta " (青春スイッチオンで宇宙キター! Seishun suitchi on de uchū kitā!),
referensi Foure Driver (フォーゼドライバー Fōze Doraibā) Sabuk yang digunakan
untuk Henshin ( Berubah ) yang mendapat kekuatan dari berbagai perangkat
yang disebut Astroswitches(ア
ストロスイッチ Asutorosuitchi) untuk menyulap lampiran ke anggota badan Fourze.
Seperti dua seri sebelumnya, protagonis Fourze melakukan debut dalam
film musim panas tahunan, di Kamen Rider OOO Wonderful: The Shogun and the 21 Core Medal